

Master the Brush: The Ultimate Guide to Warhammer Painting for Beginners in 2026
Your pile of unpainted grey plastic is not a failure of productivity. It's a high-stakes design project waiting for its first coat of Kool. Iconic. Many new hobbyists stare at a $69.00 Warhammer 40,000 Introductory Set and feel a sudden wave of anxiety. You worry about wasting expensive models or your hands shaking during warhammer painting for beginners. It's a common hurdle. Every expert painter started with a messy desk and a bit of hesitation. We get it. The massive range of paints and technical jargon can feel like a barrier instead of an invitation.
This guide changes the game. We're here to unlock the secrets of the craft so you can turn those grey squads into a curated masterpiece. You'll learn how to build a battle-ready army you're actually proud to show off. Relaxing. Creative. We're diving into the essential framework for the 2026 hobby scene. This includes a breakdown of the new 11th Edition Armageddon launch and the specific tools you need to stay ahead of the curve. It's time to stop scrolling and start creating your own iconic collection.
Key Takeaways
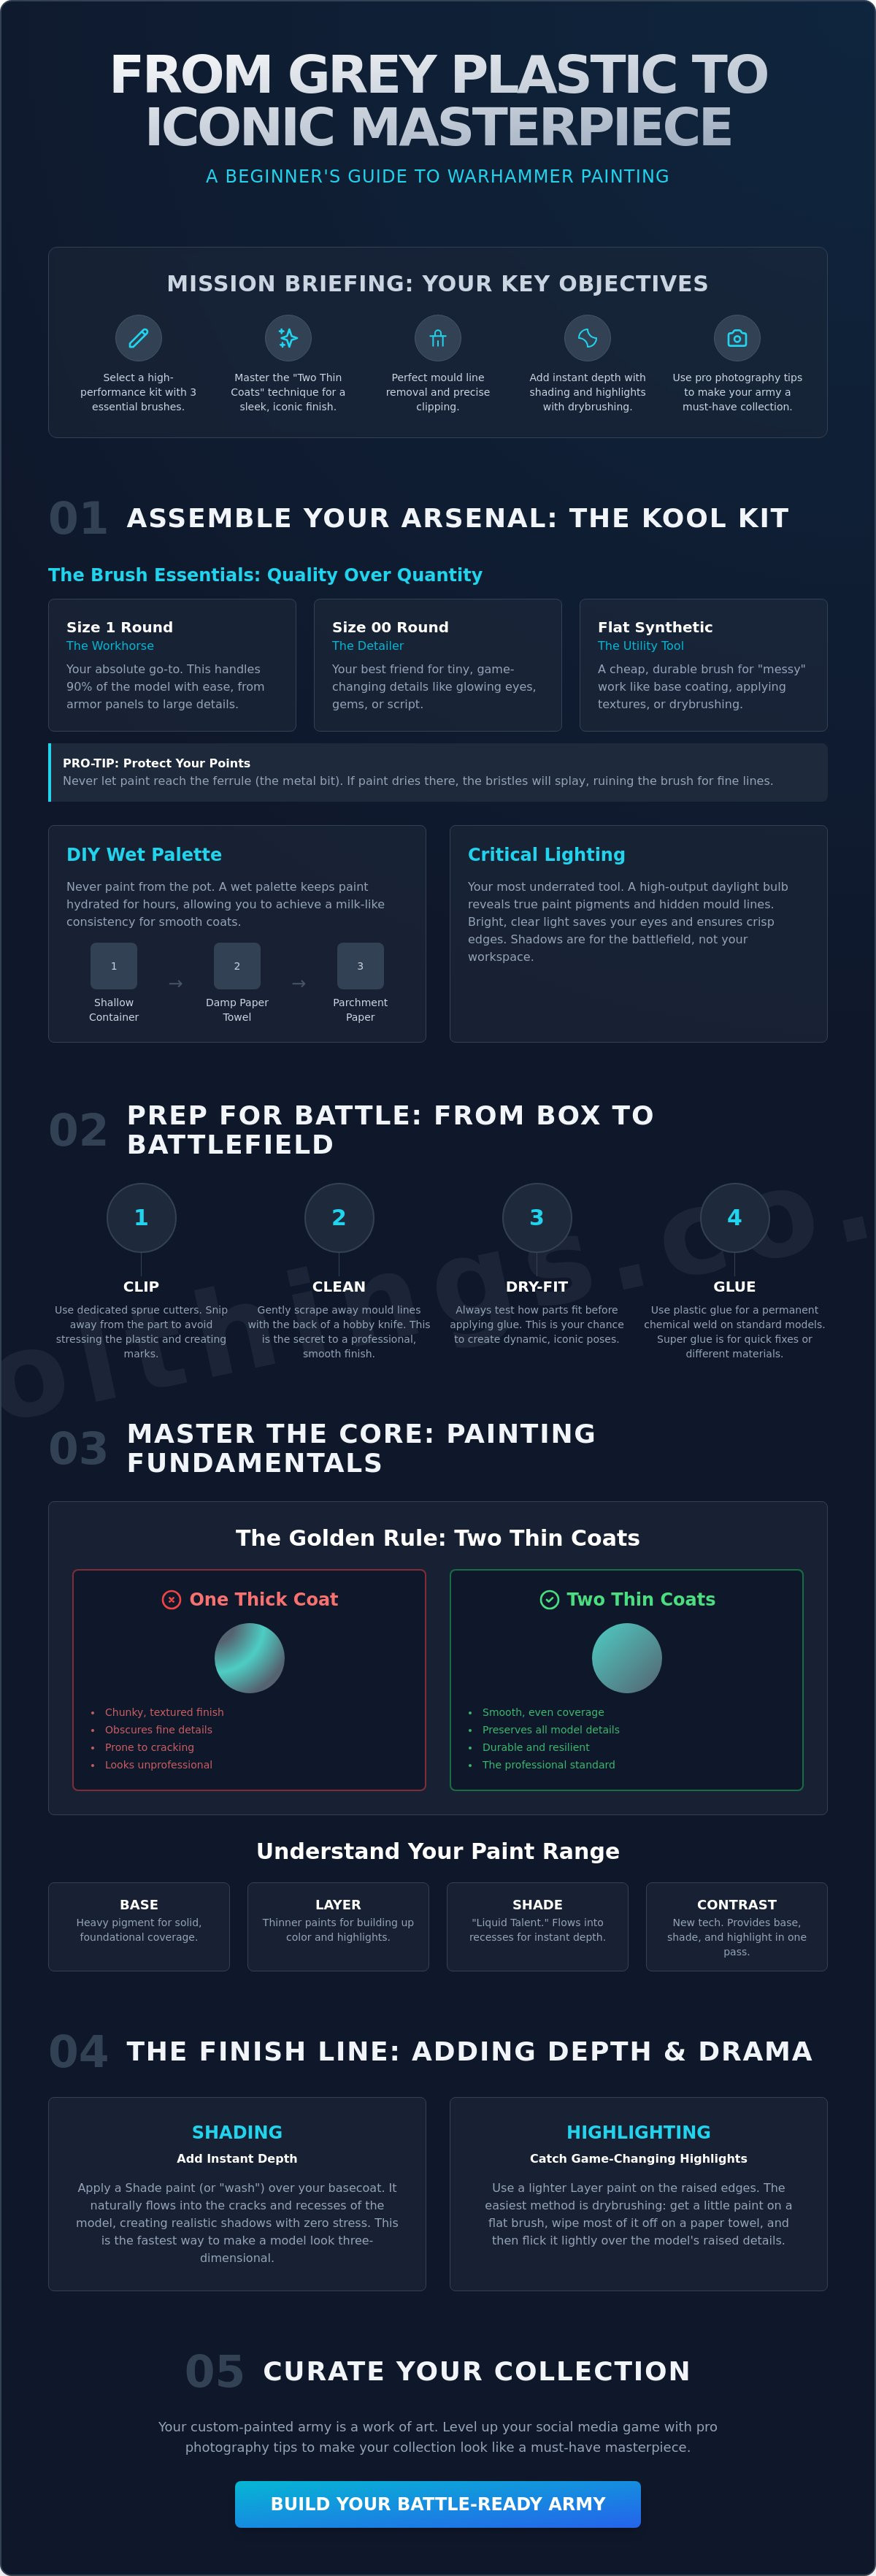
- Curate a high-performance kit by selecting three essential brush sizes that beat any bloated starter set.
- Master the "Two Thin Coats" technique to ensure your warhammer painting for beginners journey delivers a sleek, iconic finish.
- Transform your models from toys to masterpieces by perfecting the art of mould line removal and precise clipping.
- Add instant depth with shading and use drybrushing to catch those game-changing highlights with zero stress.
- Level up your social media game with pro photography tips that make your custom-painted army look like a must-have collection.
Building Your Kool Kit: Essential Tools for Beginners
Stop buying 50-piece brush sets from the bargain bin. They’re often low-quality; they shed hairs like a molting husky and will ruin your mood before you even finish your first Space Marine. This curated approach to warhammer painting for beginners ensures you spend your budget on things that actually show up on the model. You need a setup that feels professional but remains accessible. Quality over quantity is the mantra here. A few hand-picked tools will always outperform a mountain of plastic junk. It's about finding that perfect balance between utility and the "Kool" factor.
Your lighting is the most underrated part of your station. If you can't see the mould lines, you can't fix them. We recommend a high-output daylight bulb to reveal the true pigment of your paints. Something like a Batman Desk Top Light adds a touch of personality to your desk while keeping your focus sharp. When you're working on miniatures for the most popular miniature wargame in the world, precision is everything. Shadows are for the battlefield, not your workspace. Bright, clear light saves your eyes and ensures your edges stay crisp.
The Brush Essentials
You only need three brushes to conquer the galaxy. A Size 1 round brush is your absolute workhorse. It handles 90% of the model with ease. For the tiny details like glowing eyes or belt buckles, a Size 00 is your best friend. Finally, keep a cheap, flat synthetic brush for "messy" work like base coating or applying texture to the base. To keep your points sharp, never let paint reach the ferrule. That's the metal bit holding the hairs. If paint dries there, the brush will splay. It's game over for your fine lines. Synthetic brushes are great for starting out because they're durable and affordable. Save the expensive sable hair for when you’ve mastered the basics.
Your First Paint Palette
Never paint straight from the pot. It’s a rookie mistake that leads to chunky, textured armor. Mastering warhammer painting for beginners starts with understanding your medium. You want a "milk-like consistency" for every layer. This requires a palette. You can build a DIY wet palette in under two minutes using a shallow plastic container, a damp paper towel, and a piece of parchment paper. This setup keeps your paints hydrated for hours. It allows you to thin your pigments properly so you can achieve those iconic, smooth finishes. Two thin coats will always look better than one thick, gloopy mess. It's a game-changing habit that separates the amateurs from the pros.
Understanding the paint range is your final step. Base paints are heavy in pigment for solid coverage. Layers are thinner for building color. Shades are the "liquid talent" that flows into cracks for instant depth. Contrast paints are the newest tech; they provide base color and shading in one single, seamless pass. Curate your selection based on your chosen army and watch your grey plastic transform into a masterpiece.
From Box to Battlefield: Prepping Your Miniatures
The journey from grey plastic to tabletop legend starts the moment you crack open the box. It’s a rush. Whether you’ve picked up the $114.00 Warhammer 40,000 Starter Set or a sleek $35.00 squad of Infernus Marines, the prep phase is where you define your army's quality. Most people rush this. They snip, glue, and pray. Don’t be that person. Proper preparation is the secret sauce of warhammer painting for beginners. It transforms a standard model into a curated display piece. Precision at this stage makes every later brushstroke feel effortless and professional.
Clipping is your first tactical move. Use dedicated sprue cutters, not your kitchen scissors. Snip away from the part to avoid stressing the plastic. Once the parts are free, you’ll notice mould lines. These tiny ridges are the enemy of a smooth finish. Scrape them away gently with the back of a hobby knife. It takes minutes but adds massive value. For the best results, use plastic glue for your standard units. It creates a chemical weld that is essentially permanent. If you’re working with different materials or need a quick fix, super glue is your go-to. Ready to expand your forces? Explore our curated selection of Warhammer Miniatures to find your next project.
Assembly Like a Pro
Dry-fitting is a non-negotiable step. Press the parts together before applying glue to ensure the pose looks iconic. This is your chance to play with dynamic angles. With the 11th Edition launching in summer 2026, many new models feature push-fit technology. They’re easier to build, but you still need to clean the "sprue gates" where the plastic was attached. Before you commit to a permanent bond, check out these expert tips on painting approaches to decide if you should paint in sub-assemblies. Safety is paramount here. Always cut away from your body. A sharp blade is actually safer than a dull one because it requires less force.
The Art of the Primer
Primer is the most important layer you’ll ever apply. It’s not just paint; it’s a foundation that allows your pigments to grip the surface. Without it, your hard work will flake off during your first battle. Black primer is forgiving for warhammer painting for beginners because it hides missed spots. White makes colors pop. Grey is the versatile, curated choice for most schemes. Watch the weather before you spray. If the humidity is high during your May 2026 painting session, the primer can turn "fuzzy." Stick to short, sharp bursts from about 20cm away for a seamless, professional coat.
The Core Technique: Mastering the Basecoat
Your primer is dry. The canvas is ready. Now comes the moment that defines your aesthetic: the basecoat. This is the foundation of warhammer painting for beginners. Forget everything you know about house painting. Here, the mantra is "Two Thin Coats." It's the difference between a sleek, professional finish and a globby mess that obscures all those iconic details. By thinning your paint with a drop of water on your palette, you ensure the pigment flows smoothly into every recess without clogging the texture. It’s about building color through layers, not brute force.
Colour blocking is your next strategic move. Don’t just dive in. Map out your scheme. Paint the largest areas first, like the primary armor plates, before moving to the secondary details like leather straps or weapon casings. This organized approach is supported by groups like the National Association of Miniature Enthusiasts, who emphasize that a structured workflow leads to better skill retention. It keeps your project curated and prevents you from feeling overwhelmed by the sheer scale of a 11th Edition army launch. You're building a masterpiece, one section at a time.
Control is everything. If your hands shake, use the "anchor" technique. Brace your wrists against the edge of the table and touch your pinkies together. This creates a stable tripod for your brush, giving you the motor control of a pro. If paint goes astray, don't panic. It's just acrylic. Simply wait for it to dry and paint over the mistake with your original base color. It’s a game-changing realization: nothing is permanent until you varnish. Mistakes are just opportunities for a quick "Kool" fix.
Achieving a Sleek Finish
Loading your brush is an art form. Dip only the tip into the paint. If it reaches the metal ferrule, you’ve gone too far. Wipe any excess on a paper towel until the brush holds a sharp point. Patience is your best tool here. Let the first coat dry completely before applying the second. Focus your best effort on focal points like the head and the main weapon. These are the areas people notice first on the tabletop, so make them pop with extra care.
Advanced Beginner Tricks
Want battle-ready results fast? Contrast paints are pure tech. They basecoat and shade in one pass, perfect for the 114 players at the Grand Clash 2026 who need to paint dozens of models quickly. You can also try the "Slapchop" method: prime black, heavy grey drybrush, light white drybrush, then apply Contrast over the top. It's a game-changing shortcut for new painters. Finally, use the "two cup" system. Keep one water jar for regular paints and a second one exclusively for metallics. This prevents tiny glitter flakes from ruining your non-metallic surfaces.
The Finish Line: Shading and Highlighting
You’ve laid the foundation. Now it’s time to add the soul. This stage of warhammer painting for beginners is where your mini goes from "pretty good" to "must-have." Shading and highlighting are the twin pillars of the hobby. They create the illusion of scale and drama on a piece of plastic only 32mm tall. It’s about more than just color. It’s about light and shadow. Master these, and you’ll have a collection that looks like it belongs in a professional gallery. It's the ultimate way to elevate your personal aesthetic.
Shading is your first move. Washes are often called "liquid talent" because they do the heavy lifting for you. They flow into the cracks and create instant depth. However, many beginners make the mistake of slathering the whole model. This leads to a "dirty" look on flat panels like Space Marine shoulder pads. Instead, use a "pin-wash" technique. Apply the shade directly into the recesses. If it pools where it shouldn't, use a clean, dry brush to wick it away instantly. This simple trick keeps your armor plates looking sleek while your shadows stay deep and realistic.
The Magic of Washes
Choosing the right shade color is vital for a curated look. Use a brown-toned wash for gold, red, or green to create a warm, lived-in feel. For silver, blue, or grey, a black wash provides a sharp, industrial contrast. If you’re working on the new Tyranid models from the 2026 range, try a purple wash over skin tones for an alien, organic vibe. Always wait for your basecoat to be 100% dry before applying. If you rush, the colors will bleed, and you’ll lose that iconic crispness you’ve worked so hard to achieve.
Bringing the Detail to Life
Once the shadows are set, you need to bring back the light. Drybrushing is the fastest way to catch those iconic edges. Take a stiff brush, load it with a lighter color, and wipe nearly all of it off on a paper towel. When the brush seems empty, swipe it across the model’s texture. It’s a game-changing technique for fur, cloaks, and rocky bases. For armor, use the side of your brush to catch the sharpest edges. This "edge highlighting" creates a pop that defines the high-end aesthetic. Don't fear the faces. A simple dot of light on the cheekbones or the bridge of the nose is often enough to create a sense of character without the drama of painting individual pupils.
Finally, never ignore the base. A finished base grounds your miniature and makes it feel like part of a larger story. Whether you choose urban rubble or a lush alien jungle, consistency across your army is key. It’s the final step that turns a single model into a battle-ready force. Ready to start your next squad? Browse our latest Warhammer Miniatures and find your next masterpiece today.
Curating Your Collection: The Koolthings Way
Your last brushstroke is not the end of the journey. It is the beginning of your legacy as a collector. After mastering the basics of warhammer painting for beginners, you need to protect and present your work with the same intensity you used to paint it. Curation is the intentional selection and presentation of miniatures to tell a cohesive story of your personal taste and skill. It transforms a hobby into a lifestyle. Your miniatures are now part of a larger, high-end aesthetic that reflects your unique vision.
Protection is your first priority. Tabletop battles are intense. Fingers are greasy. Without a solid varnish, your "Two Thin Coats" will eventually chip. A matte varnish is the gold standard for a professional look. It kills the plastic shine and makes your colors look deep and rich. If you want specific parts to pop, like glowing lenses or alien slime, apply a gloss varnish only to those areas. It creates a game-changing contrast that catches the light during your next match. This step ensures your army remains iconic for years to come.
Showcasing Your Work
In 2026, if it isn't on social media, did it even happen? Pro-level photography is easier than you think. You don't need a thousand-dollar camera; your smartphone is already a tech powerhouse. Use a simple lightbox to eliminate harsh shadows. A clean, neutral background is essential. It lets your painting do the talking. A busy desk distracts from your hard work. Display your minis alongside your other favorite pieces, like your Steve Harrington Funko Pop, to create a curated shelf that celebrates your entire fandom. It’s about building a vibe that is uniquely yours.
Staying Inspired
The "pile of shame" is a myth. It’s actually a "library of potential." To keep the momentum, set Kool goals. Aim to paint one squad a month. This manageable pace prevents burnout and ensures your army grows steadily. Joining the community is the fastest way to level up. Share your progress on Discord or at local events. Seeing the 114 players at the Grand Clash 2026 shows just how massive this community has become. Every model you finish is a step toward becoming a master curator. Warhammer painting for beginners is your entry point into a world of infinite creativity. Keep your brushes wet, your palette clean, and your collection growing. The galaxy is waiting for your masterpiece.
Command the Tabletop with Your Masterpiece
You’ve got the framework. You know that "Two Thin Coats" and a sharp Size 1 brush are the real secrets to elite results. Mastering warhammer painting for beginners is a journey of precision and curated expression. From the first snip of the sprue to the final matte varnish in May 2026, every step you take builds a more iconic collection. It's about turning that grey plastic into a reflection of your personal aesthetic. Every highlight you place and every shadow you cast brings your army one step closer to legendary status.
Don't let your models sit in the dark. As a family-run independent business and a top-rated pop culture hub, we're here to help you curate the world’s most interesting gear. Our expertly curated selection ensures you only get the best for your hobby desk. Whether you're prepping for the summer 2026 Armageddon launch or just starting your first squad, we have the gear you need to stand out. Explore our curated range of Warhammer Miniatures and start your collection today! The galaxy is vast, but your vision is unique. Your masterpiece is waiting for its first coat of Kool.
Frequently Asked Questions
What is the best Warhammer paint set for a complete beginner in 2026?
The Warhammer 40,000: Paints + Tools Set is your best entry point for 2026. It is a curated bundle featuring essential colors and a starter brush. For roughly $40.00, you get everything needed to start warhammer painting for beginners without the stress of choosing individual pots. It is the ultimate must-have for anyone cracking open their first box of minis. This set ensures you have the right pigments to match the 11th Edition aesthetic perfectly.
Do I really need to prime my Warhammer models before painting?
Yes, priming is a non-negotiable step for a professional finish. Primer acts as a chemical bond between the plastic and your paint. Without it, your hard work will flake off during your first game. Black, white, or grey sprays are the standard choices. It is the foundation of a sleek, iconic army. Skipping this step is a rookie mistake that ruins the Kool factor of your entire collection.
How do I stop my hands from shaking while painting tiny details?
Use the tripod technique to instantly stabilize your grip. Brace your elbows on the table and touch your palms or pinkies together while holding the model. This creates a solid anchor point for your brush. Take slow, deep breaths and avoid excessive caffeine before a session. Even pro painters deal with movement; it is about managing motor control through smart positioning and steadying your station for those iconic details.
Can I use regular acrylic paints for Warhammer miniatures?
You should avoid craft store acrylics if you want a seamless look. Cheap paints have large pigment chunks that obscure fine details and look chalky on small scales. Hobby-specific paints used in warhammer painting for beginners are formulated with micro-pigments for thin, smooth coverage. Investing in a curated range of miniature paints ensures your models look like high-end collectibles rather than school projects. Quality paint is the secret to that iconic finish.
How long does it take to paint a single Warhammer miniature?
Expect to spend two to four hours on your first standard model. This includes assembly, priming, base coating, and shading. As you get faster with techniques like Slapchop, you can reduce this time significantly. A squad of ten might take a full weekend for a beginner. Speed isn't the goal; creating something you are proud to showcase is the real win. Every minute spent adds value to your curated collection.
What is the difference between "Battle Ready" and "Parade Ready" standards?
Battle Ready means your model has main colors and a simple base, making it legal for play. It is the fast lane to the tabletop. Parade Ready adds extra layers of highlights and advanced shading for a must-have display finish. Most hobbyists aim for Battle Ready first to get their army moving. You can always go back later to add those iconic Parade details once your skills have developed further.
Should I assemble my models before or after painting them?
Most beginners should assemble the entire model before painting. It is easier to see the whole vibe and prevents glue from ruining your paint job later. However, for complex models with hidden areas, sub-assemblies are the pro choice. This means painting the arms or capes separately. For your first few units, stick to full assembly to keep the momentum high and the process simple while you learn the craft.