

How to Assemble Warhammer Miniatures: The Ultimate Beginner’s Guide
That box of grey plastic on your desk isn't just a collection of parts; it's the beginning of your legend on the tabletop. Whether you just secured the high-value Armageddon launch box for the brand-new 11th edition or a classic starter set, the transition from sprue to soldier is a rite of passage. It's natural to feel a bit of "sprue-shyness" when faced with intricate details and delicate frames. Mastering how to assemble warhammer miniatures is your first real win, turning raw materials into a force to be reckoned with.
We know you want a finish that's clean, sturdy, and ready for the spotlight. No one likes messy glue marks or those frustrating mould lines ruining a perfect silhouette. This guide is your curated roadmap to building with total confidence. We'll walk you through the elite tools you actually need, the difference between various adhesives, and the pro techniques that ensure your first build is a masterpiece. Let's get those miniatures off the frame and into the fight.
Key Takeaways
- Gear up with a kool toolkit. Precision nippers and sharp hobby knives are your best friends for a clean, pro-level build.
- Master the "Two-Cut" technique to learn how to assemble warhammer miniatures without snapping or stressing delicate plastic details.
- Stick to a strategic assembly ritual. Start with core components and follow the manual to avoid confusing leftovers or mismatched parts.
- Fix mistakes like a pro. Learn how to manage excess glue and fill unsightly gaps to ensure your squad looks seamless.
- Prep for battle. Discover why solid basing and priming are the essential final steps before your army hits the tabletop.
The Essential Warhammer Assembly Toolkit
Before you dive into that Armageddon launch box, you need the right gear. Think of it as your tactical loadout. High-quality tools don't just make the job easier; they protect your investment. Understanding the basics of miniature models means knowing that plastic requires specific treatment. You wouldn't use a sledgehammer to fix a watch, so don't use garden shears on your Space Marines.
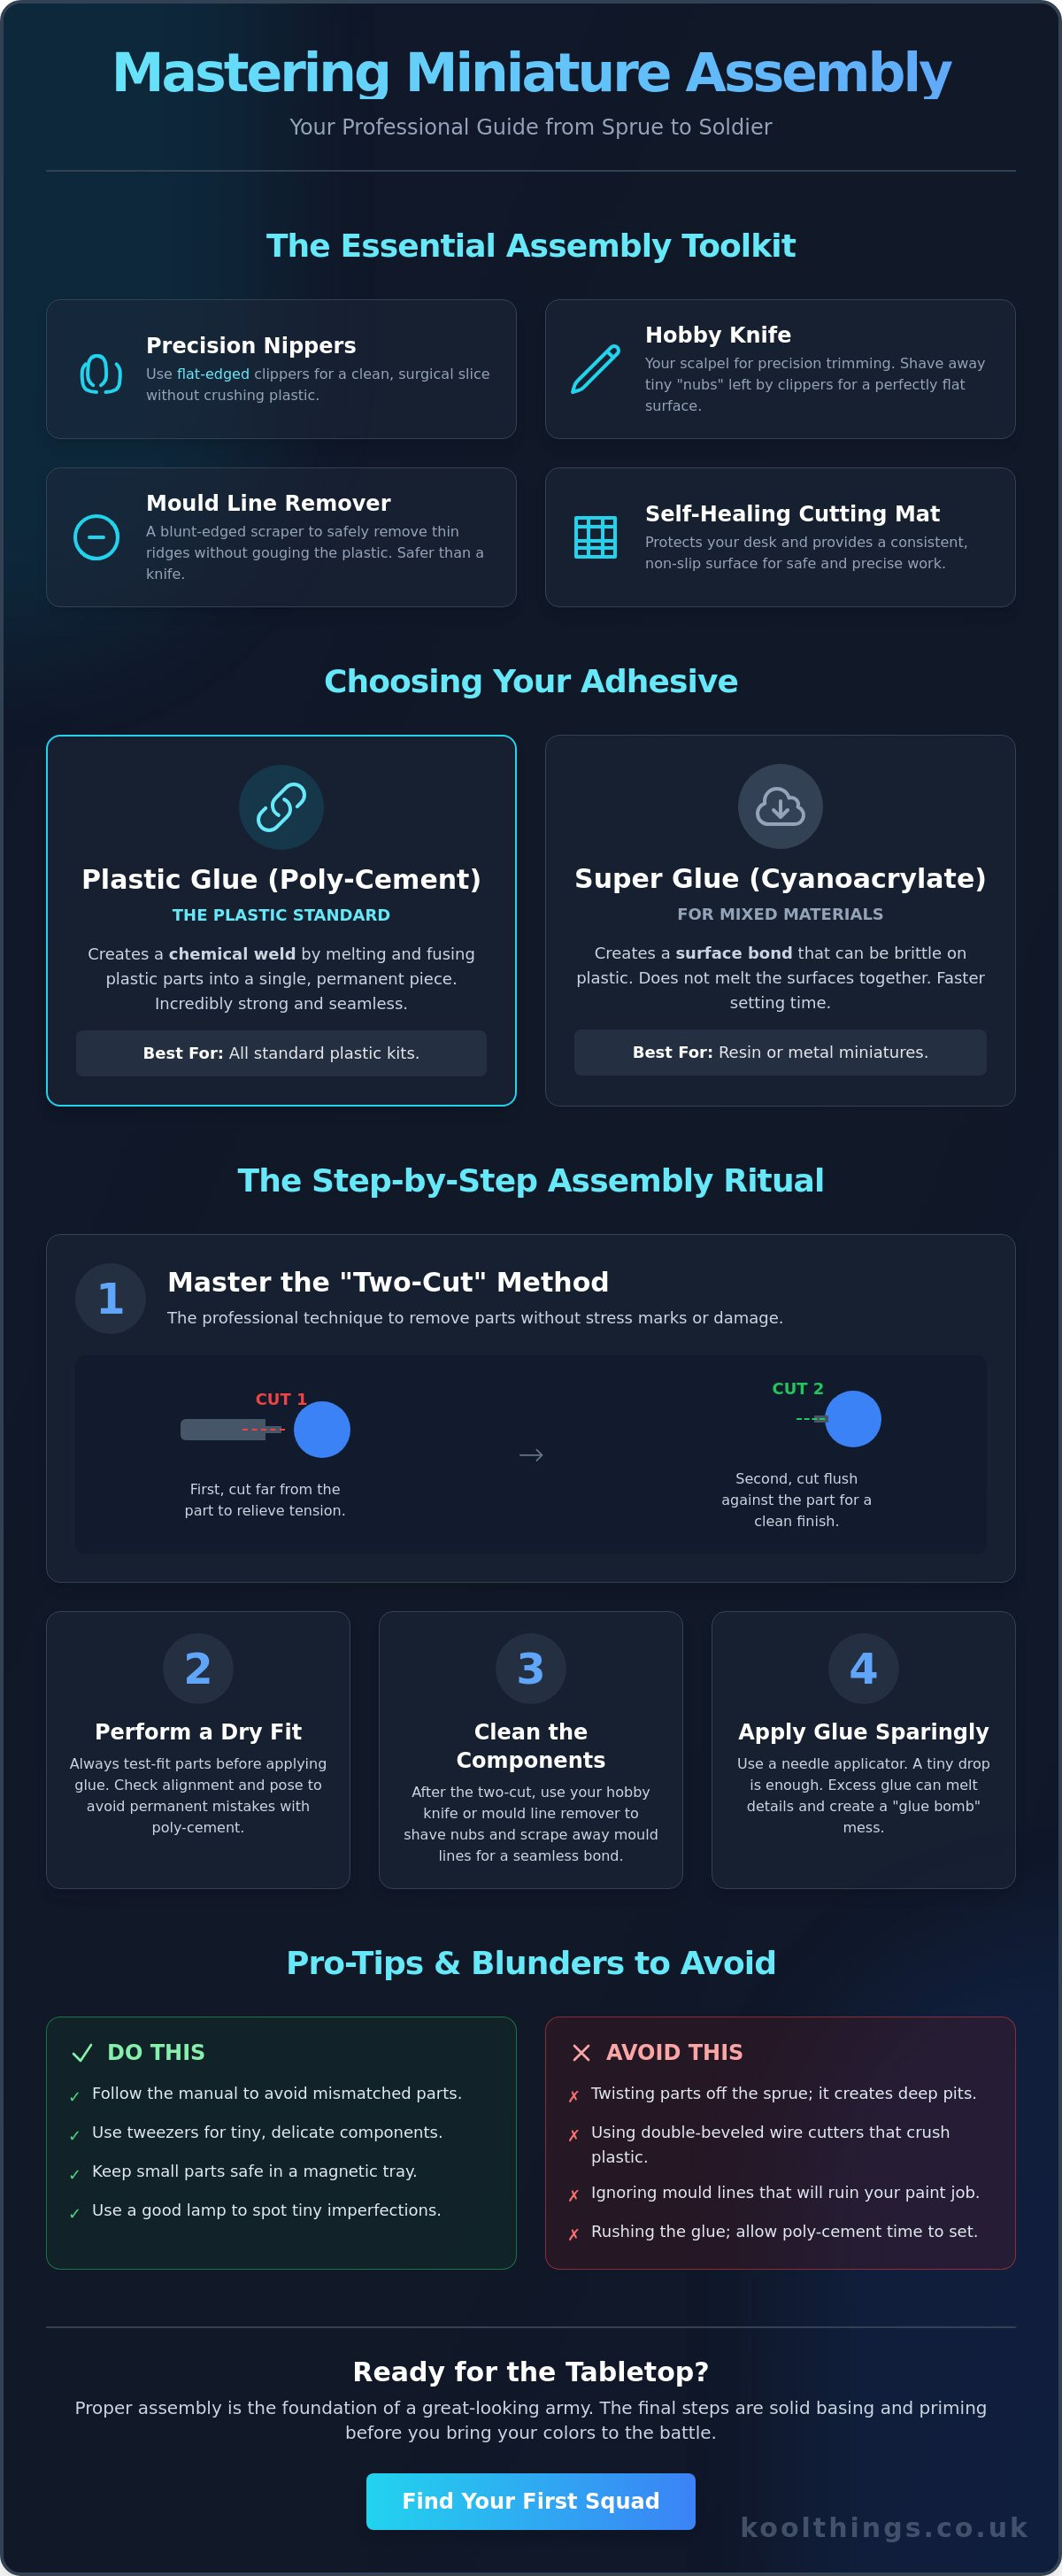
Precision clippers are your absolute first priority. Specifically, you want flat-edged nippers. Standard wire cutters from a hardware store are double-beveled, which means they pinch and crush the plastic before they cut it. This leaves ugly white stress marks or pits in your model. Flat-edged clippers sit flush against the sprue, giving you a clean, surgical slice every single time. It's the only way to start when learning how to assemble warhammer miniatures like a pro.
Next up is the hobby knife. This is your scalpel for precision trimming. Even the best clippers leave a tiny "nub" of plastic where the part was attached. A sharp blade allows you to shave these down until the surface is perfectly flat. Pair this with a self-healing cutting mat. It's not just about saving your desk from scars; these mats provide a consistent, non-slip surface that keeps your parts from skittering away while you work. Finally, grab a mould line remover. This blunt-edged scraper is the secret to removing those thin ridges where the two halves of the casting tool met. It’s safer than a knife and won’t gouge your plastic.
Choosing Your Glue: Poly-Cement vs Super Glue
The glue you choose defines how your army survives the tabletop. Plastic glue, also known as poly-cement, is a chemical weld. It literally melts the two surfaces together, fusing them into a single piece of plastic. It's incredibly strong and permanent. Super glue is different. It creates a surface bond that can be brittle. It's essential for metal or resin, but for your standard plastic kits, poly-cement is king. Always look for a bottle with a needle applicator. It gives you the control to place a tiny drop exactly where it belongs without creating a "glue bomb."
The "Kool" Extras: Tools That Make Life Easier
Want to level up? Grab a pair of precision tweezers. They are life-savers for those tiny Space Marine pouches or antenna bits that your fingers are just too big to handle. Fine-grit sanding sticks are another game-changer. They help you achieve an ultra-smooth finish on shoulder pads or vehicle panels. Finally, never underestimate a good desk lamp with a magnifying lens. It saves your eyesight and lets you spot those tiny imperfections before they become permanent mistakes during the process of how to assemble warhammer miniatures.
Decoding the Sprue: Preparation Strategy
Your sprue is a high-tech puzzle. Every arm, leg, and bolter has a specific coordinate. Don't just start snipping at random. Use the manual; it's your blueprint for success. If you're cracking open a massive set like the Armageddon launch box, organization is your best friend. Those frames are packed with detail, and losing a single shoulder pad can stall your entire build. Keep your workspace clear and your manual open.
Use the "Two-Cut" method. It’s the gold standard for how to assemble warhammer miniatures without damaging the surface. Make your first cut a few millimeters away from the part on the plastic gate. This removes the tension from the frame. Then, make your second cut flush against the model. This prevents the plastic from tearing or "pitting," which happens when the clippers' pressure pulls a chunk out of the miniature’s arm. It’s a simple trick that saves hours of repair work later.
Before the glue touches anything, perform a dry fit. Hold the parts together to see how they align. This is your chance to check the pose. Is that power sword at a heroic angle? Does the torso sit perfectly flat on the legs? Because poly-cement creates a permanent chemical bond, you want to be 100 percent sure before you commit. Mastering this step is essential when learning how to assemble warhammer miniatures that look dynamic on the tabletop. If you're ready to start your collection, check out the latest Warhammer miniatures to find your first squad.
Tiny parts like heads and pouches are easy to lose. Use a small tray or a magnetic dish to keep these microscopic options safe. It’s a small habit that prevents the heartbreak of a "headless" hero. A clean workspace reflects a clean build. Keep your tools organized and your clippings in the bin.
The Art of the Clean Cut
Always keep the flat side of your clippers facing the model. This ensures the blade slices exactly where you want it. Leave a tiny bit of "gate" plastic, about the thickness of a fingernail, to shave off later. This gives you a flush finish without risking the model's integrity. Most importantly, never twist the parts off the sprue. Twisting creates deep pits that are nearly impossible to hide with paint.
Dealing with Mould Lines
Look closely at your parts to identify the faint lines where the two halves of the mould met. These ridges are subtle but will stand out once you apply a primer. Gently scrape, don’t cut, with the back of your hobby knife or a dedicated scraper tool. Removing mould lines is the single biggest factor that separates a beginner's build from a pro-level masterpiece.
The Step-by-Step Assembly Ritual
You’ve prepped your workspace. Your tools are ready. It’s time to move from raw plastic to a tabletop warrior. This ritual is the heart of how to assemble warhammer miniatures. It’s about patience, precision, and a bit of creative flair. Don't rush. The goal is a clean, sturdy model that looks like it stepped right out of a cinematic trailer.
Start by studying your manual. Modern kits, especially those in the massive 11th edition Armageddon set, are intricate puzzles. Identify your customization options early. Do you want a chainsword or a power fist? Once you’ve decided, snip your core components first. This usually means the legs and the torso. These parts form the anchor for the rest of the build. Clean every edge using the techniques we covered in the previous section. A quick shave with your hobby knife ensures the joints sit perfectly flush.
Now, perform a final dry-fit of the main body. If it looks right, apply a tiny amount of poly-cement to the contact points. Use that needle applicator for surgical precision. Press the parts together and hold for 10 to 20 seconds. The chemical weld needs a moment to grab. Once the torso is stable, add the arms, head, and accessories. This is where you finalize the pose. A slight tilt of the head or a specific arm angle can transform a generic soldier into a legendary hero. That’s the secret of how to assemble warhammer miniatures with personality.
The Rule of Cool vs. Gaming Stats
You’ll often hear the term "WYSIWYG." It stands for "What You See Is What You Get." In competitive tournaments, your model must carry the exact weapons listed on your army roster. However, for your first squad, we recommend the Rule of Cool. Build what looks awesome to you. Aesthetics often outlast the "meta" of gaming stats. If a dual-wielding hero looks better on your shelf, go for it. Your first build should be about pride and visual impact.
Sub-Assemblies: When to Build in Pieces
Sometimes, building the whole model at once is a mistake. If a miniature is holding a large shield or wearing a flowing cape that blocks the chest, leave those parts off. This is a sub-assembly. Use a tiny bit of blue tack to test the pose, then set the obstructing parts aside. It makes painting the hidden details much easier later. Just keep your sub-assemblies organized in a small tray so you don't mix up arms between different models.
Avoiding the "Grey Shame": Common Assembly Blunders
The "Grey Shame" isn't just about having unpainted plastic on your shelf. It's about that moment you realize your hero's knees are on backward or a giant blob of glue has melted his face. Mistakes happen. Even the most seasoned hobbyists have a few disaster models in their collection. The trick is knowing how to recover without tossing the kit in the bin. Mastering these fixes is a vital part of learning how to assemble warhammer miniatures with a professional finish.
The "Glue Bomb" is a classic rookie error. You squeeze the bottle too hard and a wave of poly-cement floods the model. Stop. Do not wipe it with your finger. Wiping it smears the melted plastic and destroys the crisp detail forever. Instead, let it dry completely. Once it is hard, use a fine-grit sanding stick or your hobby knife to carefully shave back the excess. If you need a fresh squad to practice your new recovery skills, you can find a massive range of Warhammer miniatures to add to your collection.
Watch out for the "Frosting" effect if you are using super glue for certain components. This is a white, powdery residue caused by the glue's vapors reacting with moisture in the air. It can ruin a clean aesthetic instantly. To avoid it, use the tiniest amount possible and ensure your workspace has good airflow. Also, double-check your leg orientation. Many modern kits have subtle differences between left and right greaves. If you glue them upside down, the model will look awkward and unbalanced on its base.
Fixing Gaps Like a Master
Sometimes, even a perfect build has gaps. This is where "sprue goo" becomes your secret weapon. Take an old bottle of plastic glue and drop in some small chunks of leftover sprue plastic. Let them dissolve until you have a thick, molten paste. Apply this to the gaps with a toothpick. Because it is made of the same plastic as the model, it bonds perfectly. Once dry, file it down to blend the seam into the rest of the armor. It is a pro-level move for anyone learning how to assemble warhammer miniatures.
Recovering from a Bad Pose
Realized that arm is at a weird angle? Don't panic. Curing time is the window where the glue is still soft enough to allow adjustments; this usually lasts a few minutes for poly-cement. If it is already set, you might need a hobby saw for some tactical surgery. Carefully saw through the joint and re-glue. It is better to have a slightly scarred joint that you can hide with a tactical rock or a pouch than a model that looks like it is tripping over its own feet.
Next Steps: From Assembly to the Tabletop
Your squad is standing. The poly-cement has cured. You’ve successfully navigated the technical side of how to assemble warhammer miniatures. Now comes the aesthetic transformation. A miniature without a base is just a piece of plastic; a miniature with a base is a soldier in a war zone. This is where you add the grit, the history, and the character that makes your army unique. Don't let your warriors float in a grey void. Give them a world to fight for.
Texture is everything. Most hobbyists prefer adding sand or grit before they prime. It allows the glue to bond the terrain directly to the plastic for a permanent finish. If you want your leader to stand out, use "tactical rocks." Small chunks of cork or slate elevate the model, giving it a commanding presence on the battlefield. Just remember to keep the model centered. An off-balance miniature is a nightmare during a tense game of Warhammer 40,000. Stability ensures your models don't topple over when you're measuring a critical charge.
Never paint directly onto bare plastic. It is a mistake that ruins hours of assembly work. Bare plastic is too smooth for standard hobby paints to grip. Primer provides a "tooth" for your Citadel paints to grab onto. Without it, your hard work will flake off the moment you touch the model during a game. A quick, thin coat of spray primer creates a smooth, professional canvas. It preserves all that crisp detail you worked so hard to clean and align.
Basing Your Warriors
The base is more than just a stand. It is a storytelling tool. Adding texture before assembly is generally easier, but some prefer to base last to keep the feet clean. If you're building for the new 11th edition Armageddon launch, think about industrial debris or scorched earth. Use different grades of sand to create realistic terrain. A mix of fine sand and small pebbles creates a sense of scale that makes your miniatures look massive and powerful.
Ready for Battle
Your first build is a massive victory. It is the start of a collection that reflects your personal style and dedication. If you’re looking for more ways to level up your hobby game, check out our guide on Funko Pop Steve Harrington for more collector tips. While the universes are different, the passion for high-quality curation and exclusive finds is the same. Staying ahead of the curve is what makes a collector's journey exciting.
Now that you've mastered how to assemble warhammer miniatures, it is time to think about reinforcements. Whether you need more battleline troops or a massive centerpiece vehicle, explore our full range of Warhammer Miniatures to expand your army. Remember, the "Rule of Cool" is the only rule that matters in your first year. Build what you love. Play what you enjoy. Your tabletop legend starts with the very first click of the clippers. Get back to the hobby desk and start your next mission.
Build Your Tabletop Legend
Your first squad is just the beginning. You've got the toolkit. You've mastered the surgical "Two-Cut" method. You've even learned how to dodge the dreaded "Glue Bomb." These skills are the foundation of a world-class collection. Mastering how to assemble warhammer miniatures is about more than just glue; it's about the pride of creating something unique from raw plastic. Every clean seam and perfect pose brings you closer to a tabletop masterpiece.
Ready to deploy? Your next elite unit is waiting. As a family-run independent shop, we take pride in our hand-picked curated collection of the most interesting kits in the hobby. We don't just sell inventory; we select the best for our community. Plus, with our fast UK-wide shipping, your next project will be on your desk before your current prime coat even dries. It's time to expand your reach and elevate your aesthetic.
Level up your collection with the latest Warhammer sets at Koolthings. The hobby landscape is moving fast. Don't get left behind in the grey. Grab your clippers, pick your next hero, and keep building your legend. Your army is ready for the fight.
Your Assembly Intel: Frequently Asked Questions
Do I need to wash my Warhammer miniatures before assembling them?
Plastic models from the latest sets rarely need a wash. Modern manufacturing is exceptionally clean. However, if you're working with resin kits, a quick dip in warm, soapy water removes oily release agents that stop paint from sticking. For standard plastic sprues, you can just snip and go. It's all about getting to the build faster and with total confidence.
What is the best glue for Warhammer miniatures?
Plastic glue, also known as poly-cement, is the undisputed champion for your standard plastic kits. It creates a permanent chemical weld that fuses parts into a single piece. If you're mixing materials like resin or metal, reach for super glue instead. It's the best way to handle how to assemble warhammer miniatures when the components aren't purely plastic.
How long does it take for Warhammer glue to dry?
Plastic glue grabs in about 10 to 20 seconds. This gives you a tiny window to adjust the pose before it sets. The bond becomes solid within minutes, but you should wait at least 24 hours for a full chemical cure. Don't rush into painting until that bond is rock solid. Patience ensures your army survives the rigors of the tabletop.
Can I use normal scissors instead of plastic clippers?
Avoid scissors at all costs. They are too thick and apply pressure from both sides, which crushes and stresses the plastic. This leaves ugly white marks and jagged edges on your models. Invest in flat-edged precision nippers. They provide the surgical, flush cut needed for a pro-level finish without damaging your hero's armor or delicate weapons.
What should I do if I lose a tiny piece of my model?
First, check your workspace with a bright lamp. If it's truly gone, get creative. Use a "tactical rock" from your basing kit or a spare pouch from your bits box to cover the missing area. This "battle damage" adds unique character to your squad. It's a savvy way to keep your build moving when learning how to assemble warhammer miniatures.
Is it better to build or paint Warhammer models first?
Build your model first, or use sub-assemblies for complex kits. Painting on the sprue is a trap; you'll still have to clean mould lines and snip points later, which ruins your fresh paint job. Assemble the core body, then paint. This allows you to see the light and shadows on the full silhouette, ensuring a much more realistic finish.
How do I remove a model from its base if I glued it wrongly?
Slide a thin hobby knife blade carefully under the feet to pry it up. If you used super glue, placing the model in the freezer for an hour makes the bond brittle enough to snap off cleanly. For plastic glue, you'll need to be more precise with your blade since the plastic has fused. Work slowly to avoid snapping any ankles.
Can I assemble Warhammer models without the instructions?
Modern kits are incredibly detailed and often have specific, numbered parts that only fit one way. Attempting a build without the manual is a recipe for frustration. Always use the guide provided in your box. If you've lost yours, many online communities and official sites offer digital versions to save your build and keep your project on track.